
WebsiteCarousel
Adding Content Carousel to Websites
You can now add book carousels to your websites with the new Carousel Toolkit. Carousels can have up to 50 items in them and will display five items at a time on your site with arrows to page through them.
Carousels can be created using one of the Polaris predefined Dashboard elements or from a custom Record Set. The Dashboard elements include:
- Children’s Fiction Series
- Children’s Illustrated
- Early and Middle Grade Readers
- Hardcover Fiction
- Hardcover Non-Fiction
- Mass Market
- Most Circulated Titles
- New Books
- New Large Print
- New Sound Recordings
- New Videos
- On-Order Items
- Trade Paperback Fiction
- Trade Paperback Non-Fiction
- Young Adult
If you’ll be creating a Record Set, populate it with bib records rather than item records and keep the set to 50 or fewer items.
The easiest way to add a carousel to your website will be with iframe code. The Carousel Toolkit will provide the iframe code for you to copy and paste into a page on your site.
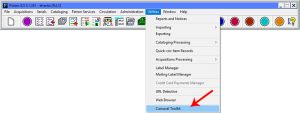
To create a carousel for your website, log into your Polaris toolbar and click on Utilities from the top menu. Click on “Carousel Toolkit” which will be the bottom option on the dropdown menu.
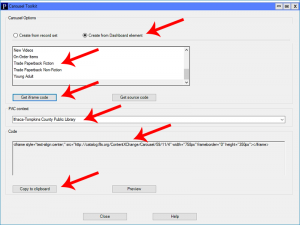
When the Carousel Toolkit window opens it will have “Create from Dashboard element” selected by default. In the “PAC context” box you’ll also see that your library is the default. If for some reason your library isn’t the default, you can change the PAC context box by using the dropdown arrow to show a list of all libraries. You can also change to another library in the PAC context box if you want to highlight something from their collection.
If you’re using a predefined Dashboard element, select it from the list.
Once selected, the “Get iframe code” and “Get source code” buttons will become live. Click the “Get iframe code” button and the Code window will populate with the correct iframe code for your website.
Click on the “Copy to clipboard” button at the bottom of the Code window.
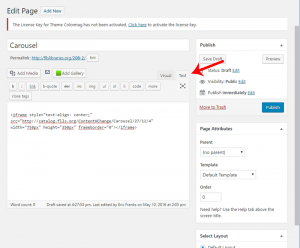
If you are adding the carousel to a WordPress page, log into your site and create a new Page or open an existing Page to edit it.
Change your page editor to “Text” rather than “Visual” and navigate to the location you want your carousel to appear.
Paste the iframe code into the page and switch the editor back to “Visual.” The carousel should appear on screen. You can also use the Preview option of WordPress to see how the page will appear to visitors of your website.
If you do not use WordPress, the iframe code should still work. You will have to determine the correct way to insert iframe code into your website using your editor.
Rather than use a predefined Dashboard element, you can also create a carousel using a Record Set. The instructions are nearly the same but rather than selecting an element from the list, choose “Create from record set.”
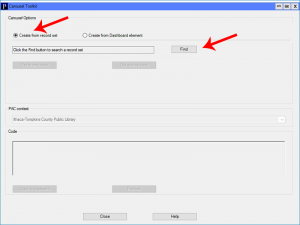
That will activate the “Find” button. Click on “Find” and the Record Set search box will open. Search for your Record Set. Double-click the Record Set name in the results box and it will return you to the Carousel Toolkit window.
Your “Get iframe code” button will be active. Click it and your code will show in the Code window. Copy and paste the iframe code into your website.